Styling a Shopify Themes with TailwindCSS can seem daunting at first. Especially if you’re diving into the world of Liquid code and TailwindCSS for the first time. But don’t worry! This step-by-step guide will walk you through the process, making it approachable, even for beginners. By the end of this tutorial, you’ll be able to use TailwindCSS to create beautifully styled Shopify themes.
Getting Started: Why Use TailwindCSS in Shopify?
TailwindCSS is a highly customizable utility-first CSS framework. Its simplicity, flexibility, and time-saving features make it a popular choice among developers. Integrating TailwindCSS with Shopify’s Liquid templates enhances your ability to create dynamic, visually appealing e-commerce themes without compromising performance.

Table of Contents
Step-by-Step Guide to Setting Up TailwindCSS in Shopify Liquid Code
Follow these steps to configure TailwindCSS in your Shopify theme efficiently.
Initialize Your Shopify Theme
The first step is to set up a new Shopify theme directory. Use the Shopify CLI (Command Line Interface) to create your theme. Open your terminal and run:
shopify theme init my-new-theme
This command initializes a new directory called my-new-theme. Navigate into it using:
For more detail Click here
Once the setup is done, navigate into your theme directory:
cd my-new-theme
Pro Tip: If you’re unfamiliar with the Shopify CLI, explore our Beginner’s Guide to Shopify Theme Development for an in-depth introduction.
Step 3 : Set Up Node.js in Your Theme Directory
Shopify themes don’t natively support TailwindCSS, so we need to set up Node.js. Run the following command to initialize Node.js and create a package.json file:
npm init -y
This file will allow us to manage dependencies and scripts for TailwindCSS.
Step 3: Install TailwindCSS
Now for the exciting part—installing TailwindCSS!
Install TailwindCSS as a dev dependency:
npm install -D tailwindcss
Generate a Tailwind configuration file:
npx tailwindcss init
This creates a tailwind.config.js file, where we’ll configure Tailwind for Shopify’s Liquid and JSON files.
Step 4: Edit the Tailwind Config File
Update the tailwind.config.js file to include Liquid and JSON templates. Replace the content section with the following:
/** @type {import('tailwindcss').Config} */
module.exports = {
  content: [
    './layout/**/*.liquid',
    './templates/**/*.liquid',
    './snippets/**/*.liquid',
    './sections/**/*.liquid',
    './assets/**/*.liquid',
    './config/**/*.json'
  ],
  theme: {
    extend: {},
  },
  plugins: [],
}
This tells Tailwind to scan all Liquid and JSON files in your Shopify theme for class usage.
Step 5: Add a Build Script for TailwindCSS
"scripts": {
	"tw": "npx tailwindcss -i ./src/tailwind.css -o ./assets/tailwind.css --watch"
}
Now, open your package.json file and add a new script under the scripts section:
This script will process your TailwindCSS input file (src/tailwind.css) and output the CSS to Shopify’s assets folder.
Step 6: Add the Tailwind CSS File to Your Theme
Create a src/tailwind.css file (if it doesn’t already exist) and add this:
@tailwind base;
@tailwind components;
@tailwind utilities;
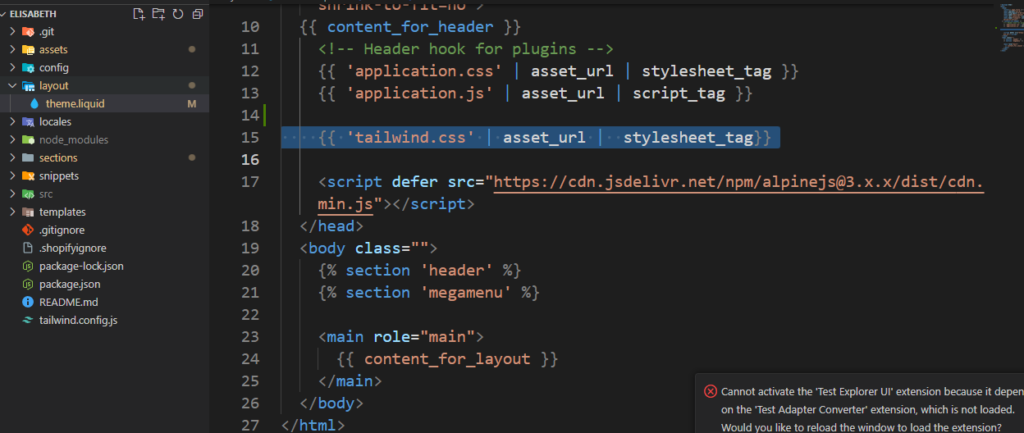
Then, include the generated CSS file in your theme.liquid layout. Add this line inside the section:
In the head tag of theme.liquid file add file name of
{{ 'tailwind.css' | asset_url | stylesheet_tag }}
Step 7: Run Shopify and Tailwind Servers
Now it’s time to see everything in action. Run the following commands:
Start the Shopify server to preview your theme locally:
shopify theme dev
In another terminal (in the same theme directory), start the TailwindCSS watcher:
npm run tw
Test Your Setup
Navigate to your Shopify development store in the browser. You can now apply TailwindCSS classes directly in your Liquid templates to create modern, responsive designs.
Benefits of Using TailwindCSS in Shopify
- Speed and Efficiency: TailwindCSS reduces the need for writing custom CSS from scratch.
- Customizability: Easily modify your design system to align with your brand identity.
- Responsive Design: Tailwind’s utility classes make building mobile-friendly themes a breeze.
- Developer-Friendly: Its modular structure ensures a clean and maintainable codebase.
Common Issues and Solutions
1. Tailwind Classes Not Working?
Ensure your tailwind.config.js file points to all relevant file paths (.liquid and .json).
2. CSS File Not Found in Shopify?
Double-check the path in the <link> tag inside your theme.liquid.
3. Changes Not Reflecting?
Verify that both the Shopify server and Tailwind watcher are running.
Handy Resources
FAQs
What is TailwindCSS, and why should I use it in Shopify?
TailwindCSS is a utility-first CSS framework that simplifies styling. It offers a faster, more efficient way to design Shopify themes compared to traditional CSS.
Can I use TailwindCSS with an existing Shopify theme?
Yes, you can integrate TailwindCSS into any Shopify theme by following the steps outlined in this guide.
Do I need coding experience to use TailwindCSS in Shopify?
Some basic knowledge of HTML, CSS, and Shopify Liquid is helpful but not mandatory.
How do I update TailwindCSS in my Shopify theme?
Simply update the dependency in your project using npm update tailwindcss and adjust configurations if needed.
Does TailwindCSS affect site performance?
When configured correctly, TailwindCSS generates optimized CSS, ensuring minimal impact on site performance.
Is TailwindCSS free to use?
Yes, TailwindCSS is open-source and free for commercial use.
Conclusion
Integrating TailwindCSS with Shopify Liquid code unlocks endless possibilities for creating stunning, responsive e-commerce themes. With its modular design and intuitive setup, TailwindCSS empowers developers to work smarter, not harder.
Take the first step today, and watch your Shopify store transform into a sleek, modern shopping experience!
Inbound Links:
- Beginner’s Guide to Shopify Theme Development
- Advanced Shopify Customization Tips
Outbound Links:
Would you like further assistance with implementation or optimization tips? 😊


